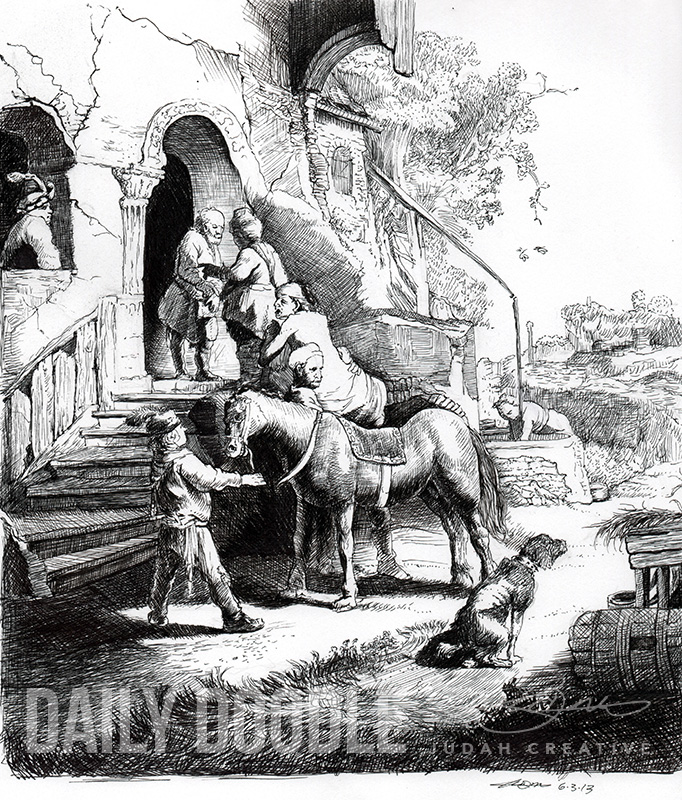

Rembrandt Etching Study – The Good Samaritan – Final
Posted by Judah on Jun.05,2013 in Daily Doodle, Study of Masters with 0 CommentsThis was by far one of the most difficult ink drawings I’ve done in a long, long time. I think it took about 7 settings to complete. It’s finally done! It’s no Rembrandt, but it’s my attempt to press towards his mastery! Do note, the original is an etching, and I’m using a variety of ink pens, which do a pretty good job of mimicking etching lines, but it’s a completely different process of mark making, and therefore, can’t look exactly the same (I suppose it’s possible). Anyway, I learned so much from this study, such as how to make more subtle marks for greater contrast against the heavy, dark lines. It forced me to do things with a pen that I’ve not attempted before.
I think I’ll do a Robert Howe next for a Master study. I have a dragon paining in mind…
Rembrandt Etching Study – The Good Samaritan – Final Illustration by Judah Fansler (Yet another Daily Doodle) – Design Ninja, Artist, Owner at Judah Creative, a Graphic Design & Illustraiton Studio near Branson & Springfield, MO.
- Explore (if you're curious)
-
 Digital Painting Study #18: Study Claude Monet’s Woman with a Parasol – Madame Monet and Her Son: Final

-
 Digital Painting Study #18: Study Claude Monet’s Woman with a Parasol – Madame Monet and Her Son: Phase 1
-
 Digital Painting Doodle #16: Study of Caravaggio’s The Crowning With Thorns: Phase 2
-
 Digital Painting Doodle #15: Study of Vermeer’s The Milkmaid: Final
-
 Digital Painting Doodle #15: Study of Vermeer’s The Milkmaid: Phase 2: Torso Detail